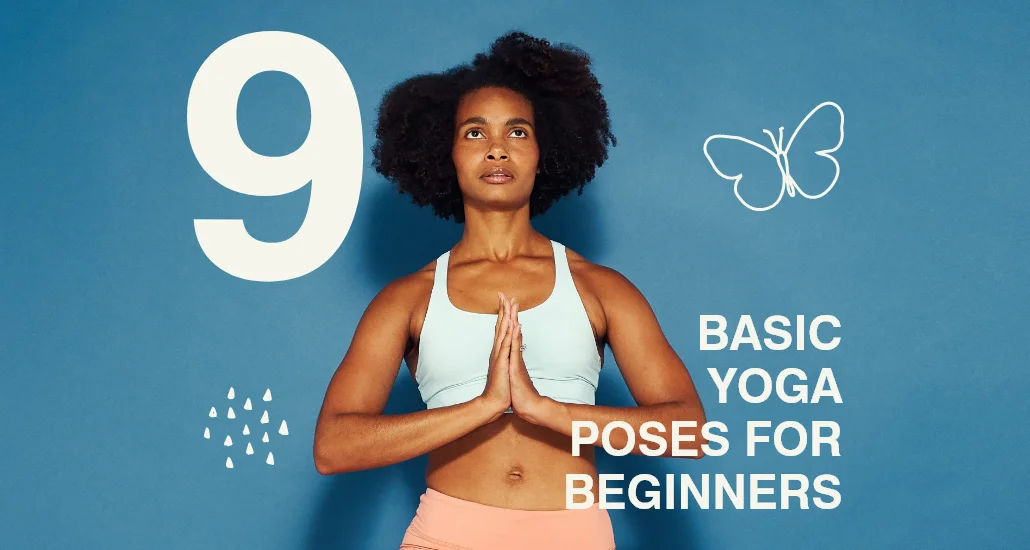
Starting a yoga practice begins with learning basic yoga poses, creating a solid base for future growth.
The practice of yoga offers a transformative journey for individuals of all levels, and for those new to this ancient discipline, establishing a solid foundation is key.
We will go over the top 9 yoga poses for beginners in this article, along with a step-by-step guide for each yoga pose.
Whether you’re looking to embrace the tranquillity of Hatha yoga or embark on a journey of self-discovery, these fundamental poses will set the stage for a fulfilling and enriching yoga practice.
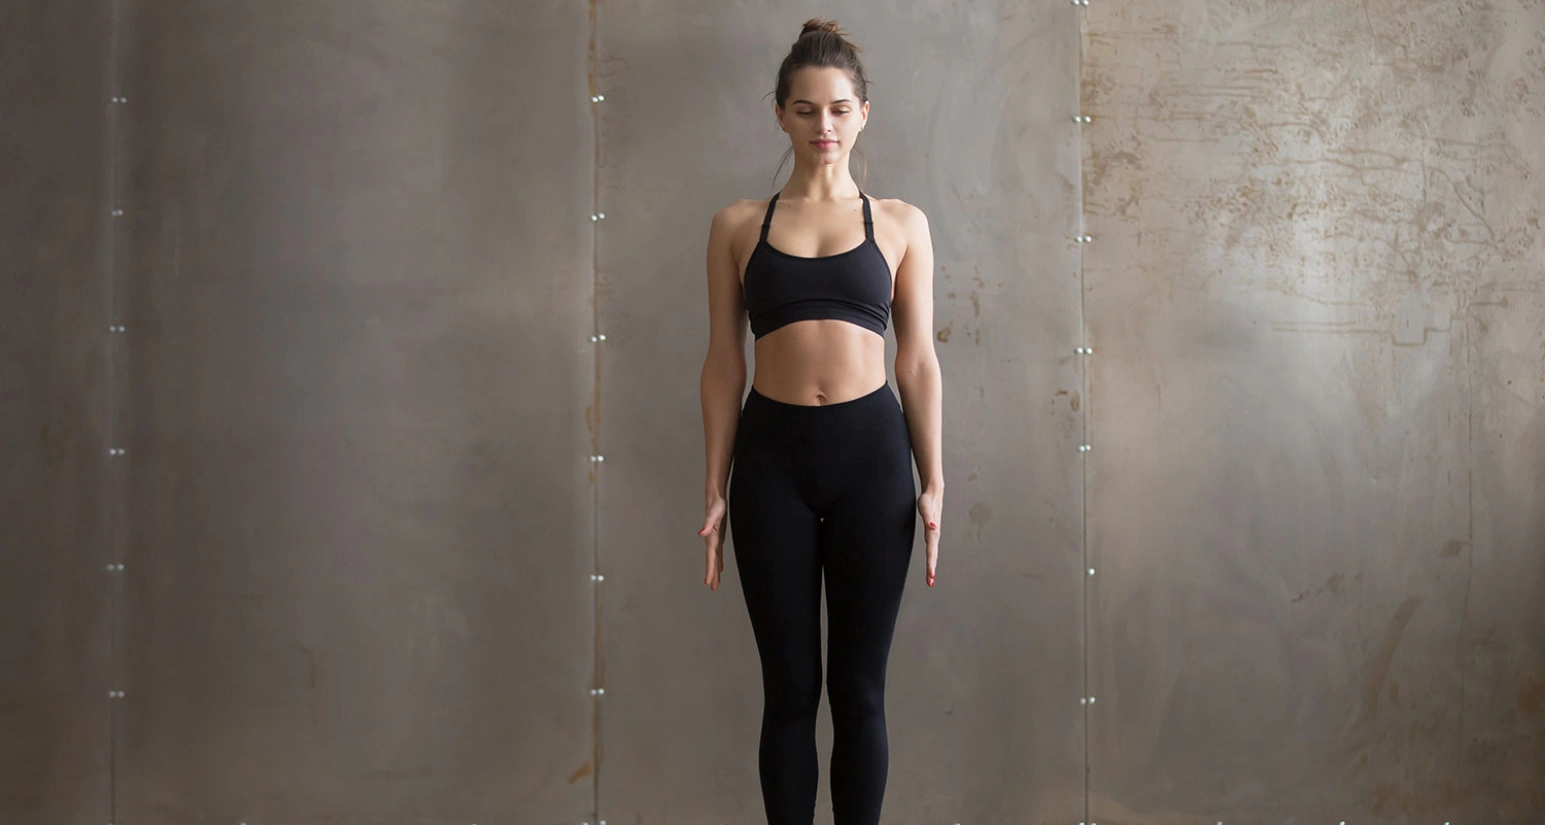
Mountain Pose/Tadasana
Mountain Pose, or Tadasana, is a foundational yoga pose that is great for beginners and experienced yogis alike.
While it may appear simple, it is actually a very complex pose that can help strengthen the legs, core, and back muscles to improve posture. It is also a great pose to practise mindful
breathing and to become grounded and centred.
This basic standing pose promotes balance, core strength, and groundedness, making it an excellent starting point for those new to yoga.
Benefits of Mountain Pose for Beginners:
- Improves Posture: Practising Tadasana encourages proper alignment of the spine, shoulders, and pelvis, helping to correct posture over time.
- Builds Awareness: It fosters a heightened sense of body awareness, teaching beginners to stand with steadiness and purpose.
- Strengthens Legs: Engaging the muscles in the legs not only helps to improve them but also promotes stability in the knees and ankles.
- Promotes Focus: The attention required in maintaining the pose helps to improve focus and concentration.
- Foundation for Other Poses: Tadasana lays the groundwork for understanding the alignment needed in more complex yoga poses.
In order to perform mountain pose, You can simply follow the following steps:
- Start Standing: Begin by standing with your feet together, heels slightly apart, or hip-width apart if that feels more stable. Spread your toes wide and press them firmly into the mat.
- Align Your Body: Engage your thigh muscles, lifting your kneecaps slightly. Ensure your weight is evenly distributed across the soles of your feet.
- Engage Your Core: Draw your belly button towards your spine to engage your core muscles, providing stability to your lower back.
- Straighten Your Spine: Lengthen your spine upwards as if a string is pulling you from the top of your head. Relax your shoulders down and back, opening your chest.
- Position Your Arms: Let your arms hang naturally by your sides with your palms facing forward or towards your body, fingers active.
- Direct Your Gaze: Fix your gaze straight ahead with your chin parallel to the floor, maintaining a neutral neck. Breathe deeply and evenly.
- Hold the Pose: Stay in this position for 30 seconds to a minute, focusing on your breath and the sensations in your body. Feel the strength and stability in your stance.
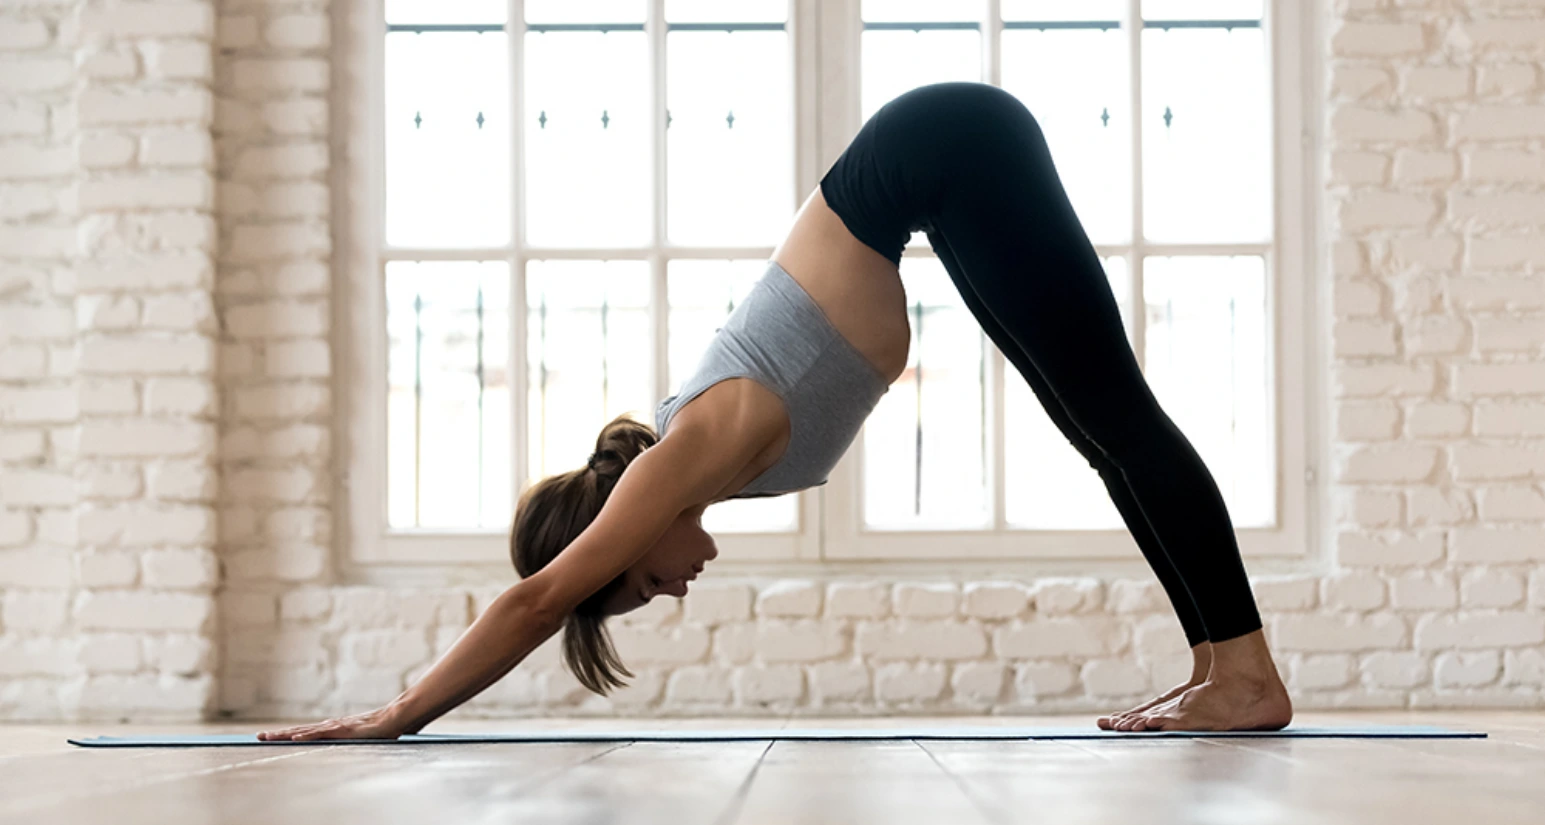
Downward Dog/Adho Mukha Svanasana
Known as Downward Facing Pose or Adho Mukha Svanasana, this is one of the best hatha yoga poses for beginners. The beginner can enter the world of advanced yoga postures with the help of a downward-facing dog pose.
This posture from Hatha Yoga offers the body benefits of toning, irrigating, and oxygenating at the same time.
Benefits of Downward Dog for Beginners:
- Enhances Flexibility: This pose deeply stretches the hamstrings, calves, and the arches of the feet, improving overall flexibility.
- Strengthens Upper Body: It builds strength in the shoulders, arms, and upper back, as these areas support much of the body’s weight in the pose.
- Improves Circulation: As a mild inversion, Downward Dog helps increase blood flow to the brain, which can boost energy levels and improve concentration.
- Relieves Back Pain: Elongating the spine can help relieve tension and pain in the back, making it beneficial for those who sit for long periods.
- Encourages Body Awareness: Practicing Downward Dog helps beginners develop a better sense of their body’s alignment and posture.
In order to perform downward dog pose, You can simply follow the following steps:
- Start in Tabletop Position: Begin on your hands and knees, with your wrists directly under your shoulders and your knees under your hips. Spread your fingers wide for a solid base.
- Lift Your Hips: Exhale as you tuck your toes under, lift your knees off the floor, and raise your hips toward the ceiling. Straighten your legs as much as you can, but keep a slight bend in the knees to avoid straining.
- Press Through Your Hands: Push the floor away from you with your hands, deepening the stretch in your spine. Ensure your arms are straight and your shoulders are broad.
- Adjust Your Feet: Your feet should be hip-width apart, with your heels pressing toward the floor. It’s okay if your heels don’t touch the ground; the intention is to lengthen the calves and hamstrings.
- Refine Your Pose: Rotate your arms externally so that your elbow creases face your thumbs. Draw your ribs in to prevent your back from arching too much, and lift your sitting bones up and back.
- Hold and Breathe: Maintain the pose for 30 seconds to a minute, breathing deeply. Focus on spreading the weight evenly between your hands and feet, and try to lengthen your spine and lift your hips higher with each exhale.
- Release: To come out of the pose, exhale as you gently lower your knees back to the floor, returning to the Tabletop Position or moving into a Child’s Pose for rest.
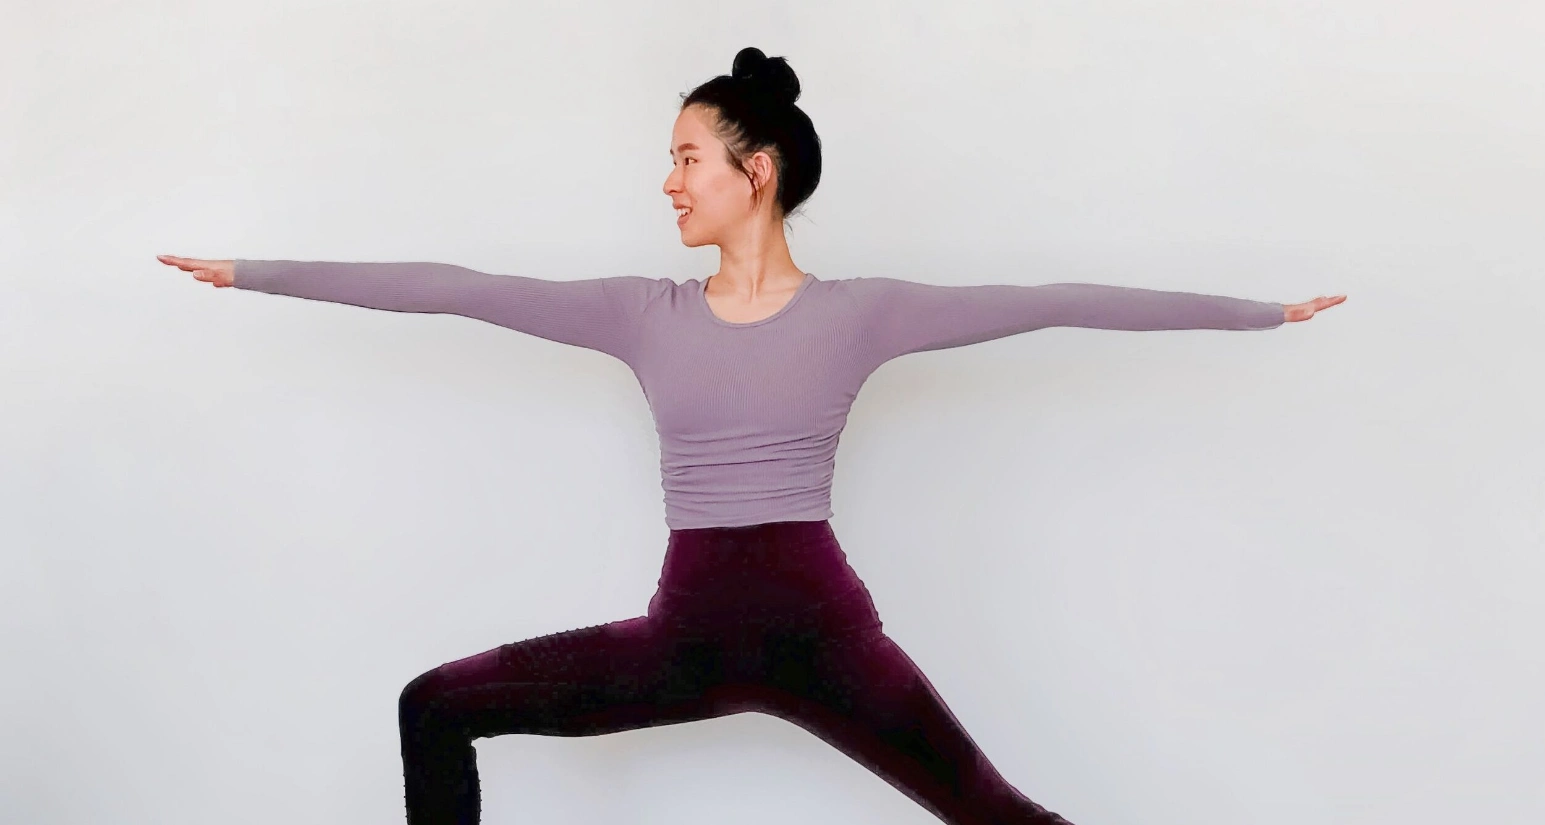
Warrior II Pose/Virabhadrasana II
Warrior II Pose, or Virabhadrasana II, stands as a beacon of strength and stability, accessible to both novices and seasoned practitioners in the realm of yoga.
Though it might seem like a test of balance and flexibility, its true essence lies in the cultivation of inner strength and the enhancement of focus and determination.
This pose not only fortifies the muscles in the legs and arms but also engages the core, promoting improved posture and balance.
As a pose that bridges the physical with the mental, Warrior II lays a solid foundation for a more profound yoga practice, emphasizing the importance of alignment, breath control, and mental clarity.
Benefits of Warrior II Pose for Beginners
- It bolsters the strength of leg, arm, and core muscles, aiding in better posture and balance.
- Encourages mindful breathing, fostering a sense of stability and presence.
- Acts as a cornerstone for mastering more complex standing yoga poses, essential for beginners’ progression in yoga.
In order to perform warrior II pose, You can simply follow the following steps
- Begin in a standing position, stepping your feet wide apart, roughly a leg’s length.
- Rotate your right foot out 90 degrees, aligning the right heel with the left foot’s arch. Keep your left foot slightly turned in.
- Extend your arms parallel to the floor, reaching energetically through your fingertips, palms facing down.
- Bend your right knee, ensuring it is directly over your right ankle and aiming to be parallel to the floor.
- Keep your torso even between your hips, shoulders stacked above your hips, and gaze out over your right hand.
- Hold this powerful stance, breathing deeply, feeling the strength in your pose mirrored by an inner strength within.
- To release, inhale as you straighten your right leg, lower your arms, and return to a standing position before switching sides.
Child's Pose/Balasana
Child’s Pose, or Balasana, is a sanctuary of calm in the yoga practice, particularly beneficial for beginners. This restorative pose mirrors the natural fetal position, embodying comfort and security. It’s a gentle invitation to slow down, offering a pause in the flow of more active poses. By fostering a deep connection with the breath, Child’s Pose helps to release tension in the back, shoulders, and neck, making it an ideal posture for relaxation and stress relief.
Benefits of Child's Pose for Beginners:
- It encourages a profound sense of relaxation and ease, reducing stress and anxiety.
- Gently stretch the spine, hips, thighs, and ankles, alleviating tension and soreness.
- Supports digestion by softly massaging the abdominal organs.
- It serves as an accessible pose for all levels, helping beginners to familiarise themselves with the principles of breath and mindful movement.
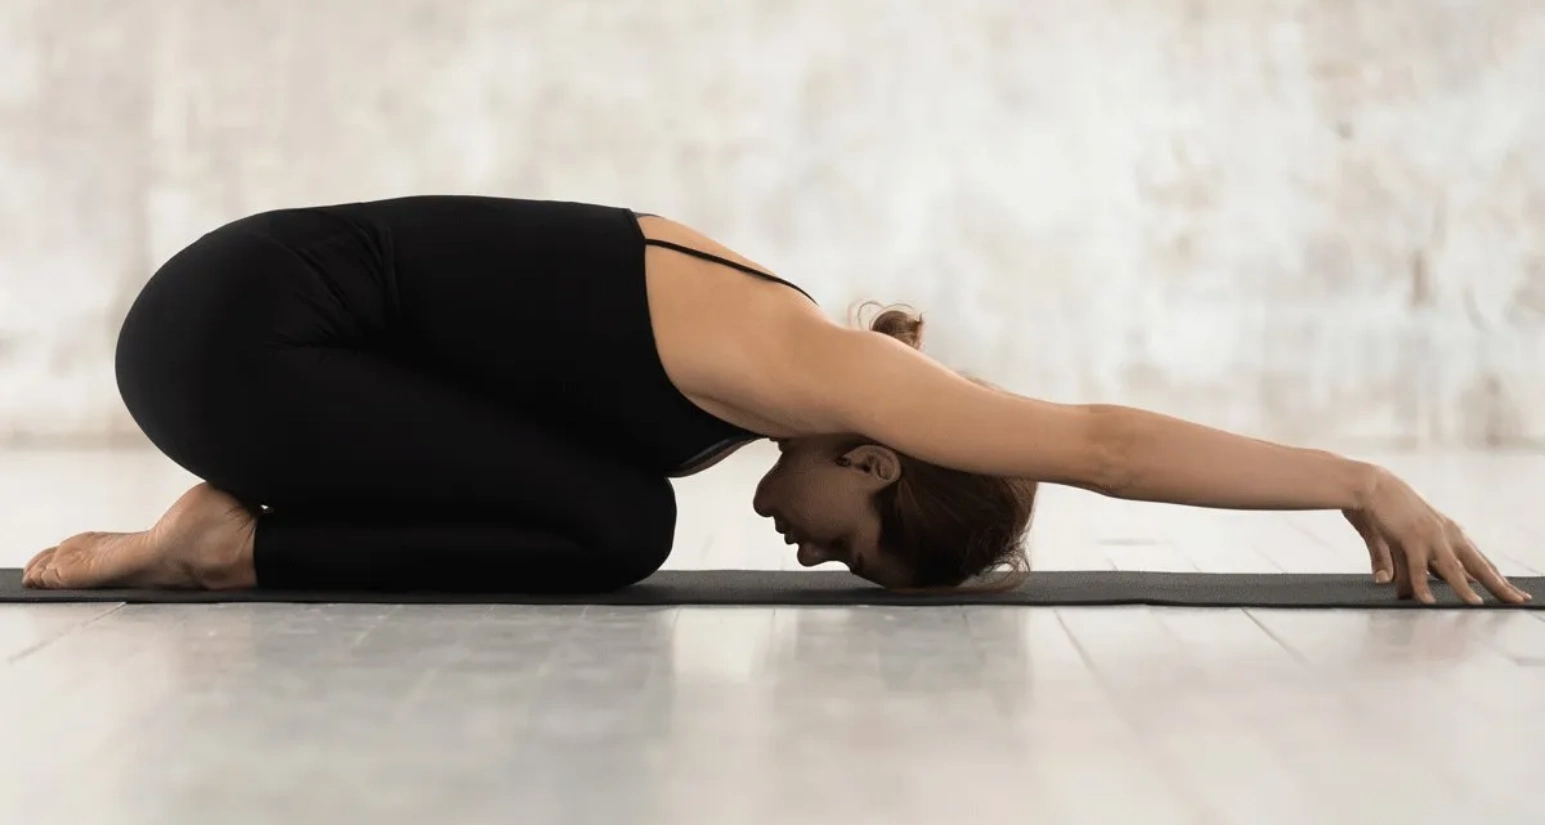
In order to perform child's pose, You can simply follow the following steps
- Start on Your Knees: Begin by kneeling on your mat, with your big toes touching and knees hip-width apart or wider if that feels more comfortable.
- Lower Your Torso: Exhale as you fold forward, extending your torso between your thighs. Aim to rest your forehead gently on the mat.
- Extend Your Arms: Stretch your arms out in front of you with palms facing down on the mat. Alternatively, for a more restful variation, you can bring your arms alongside your body with palms facing up.
- Deepen the Stretch: As you settle into the pose, gently press your chest towards the mat to deepen the stretch in your back. Ensure your shoulders are relaxed away from your ears.
- Focus on Your Breath: Embrace the stillness of the pose, focusing on deep, slow breaths. Allow each exhale to release any remaining tension in your body.
- Hold the Pose: Stay in the Child’s Pose for as long as needed, using it as a moment of rest and introspection. To exit the pose, use your hands to press yourself back up to a seated position gently
The Cat/Cow Pose
The Cat/Cow Pose, transitioning seamlessly between Marjaryasana (Cat Pose) and Bitilasana (Cow Pose), is a cornerstone in yoga practice, particularly revered for its role in warming up the body and enhancing spinal flexibility.
This fluid movement between poses is not only pivotal for preparing the body for more intense yoga sequences but also instrumental in fostering an acute awareness of spinal alignment and breath movement synchronisation.
For beginners, the Cat/Cow Pose serves as an essential introduction to the principles of yoga, emphasising the synchronisation of breath with movement and the importance of spinal health.
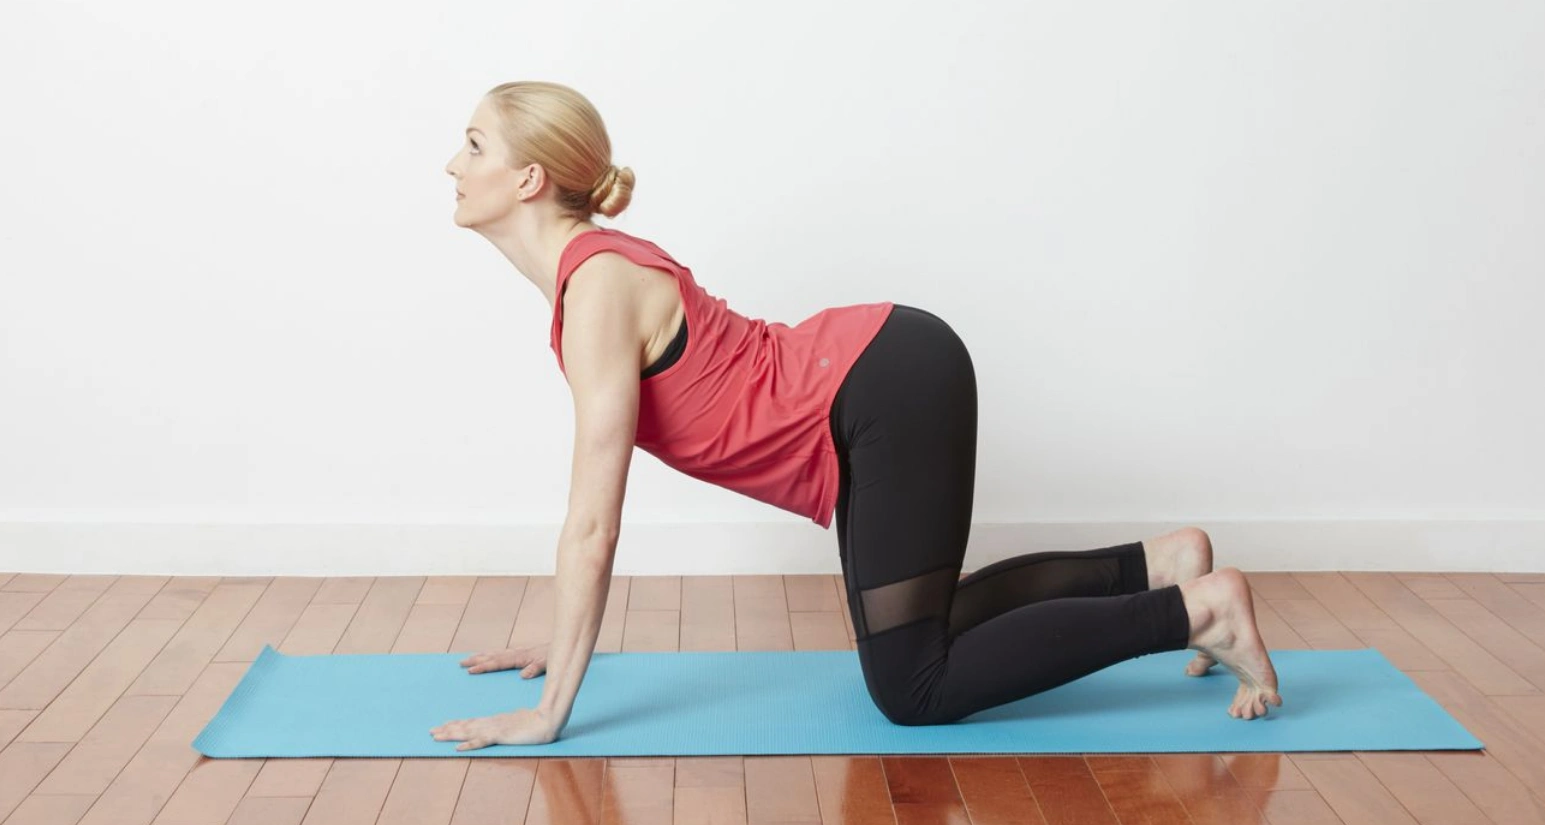
Benefits of Cat/Cow Pose for Beginners:
- Promotes Spinal Flexibility: Regular practice of Cat/Cow Pose increases the spine’s flexibility, which is crucial for a healthy and sustainable yoga practice.
- Prepares the Body for Practice: Acting as a gentle warm-up, it readies the muscles and joints for subsequent poses, reducing the risk of injury.
- Enhances Breath Awareness: It teaches beginners how to control their breathing, linking breath to movement, a fundamental yoga principle.
- Relieves Stress and Calms the Mind: The rhythmic, flowing nature of the poses helps calm the mind, reducing anxiety and stress levels.
- Improves Posture: Strengthening the spine and neck aids in correcting and maintaining good posture.
- Stimulates Digestive Health: The movement massages the abdominal organs, enhancing digestive function.
In order to perform a cat/cow pose, You can simply follow the following steps.
- Start on All Fours: Begin in a tabletop position with your wrists directly under your shoulders and your knees under your hips. Spread your fingers wide, pressing firmly through your palms.
- Cow Pose – Inhale: Transition into Cow Pose by inhaling as you drop your belly towards the mat, lifting your chin and chest, and gazing up toward the ceiling. Be mindful to draw your shoulders away from your ears to lengthen the neck.
- Cat Pose – Exhale: Move into Cat Pose by exhaling as you draw your belly to your spine, rounding your back toward the ceiling like a cat stretching. Bring your chin towards your chest, focusing on fully articulating your spine.
- Flow Between Poses: Continue flowing between Cow Pose on your inhales and Cat Pose on your exhales, allowing your breath to guide the movement. Each inhale opens the chest in Cow, and each exhale rounds the spine in Cat.
- Maintain Alignment: Keep your wrists under your shoulders and your knees under your hips throughout the sequence to maintain proper alignment and support.
- Frequency: Repeat this sequence for 1-2 minutes, or as long as it feels comfortable, gradually increasing the fluidity and depth of each movement.
Easy Pose/Sukhasana
Easy Pose, or Sukhasana, is a foundational seated posture in yoga, embodying simplicity and comfort.
It is particularly beneficial for beginners as it introduces the concept of seated meditation poses, focusing on alignment, breath, and mental clarity.
Sukhasana is often underestimated for its simplicity, yet it holds profound benefits for mental and physical health, especially in stress relief.
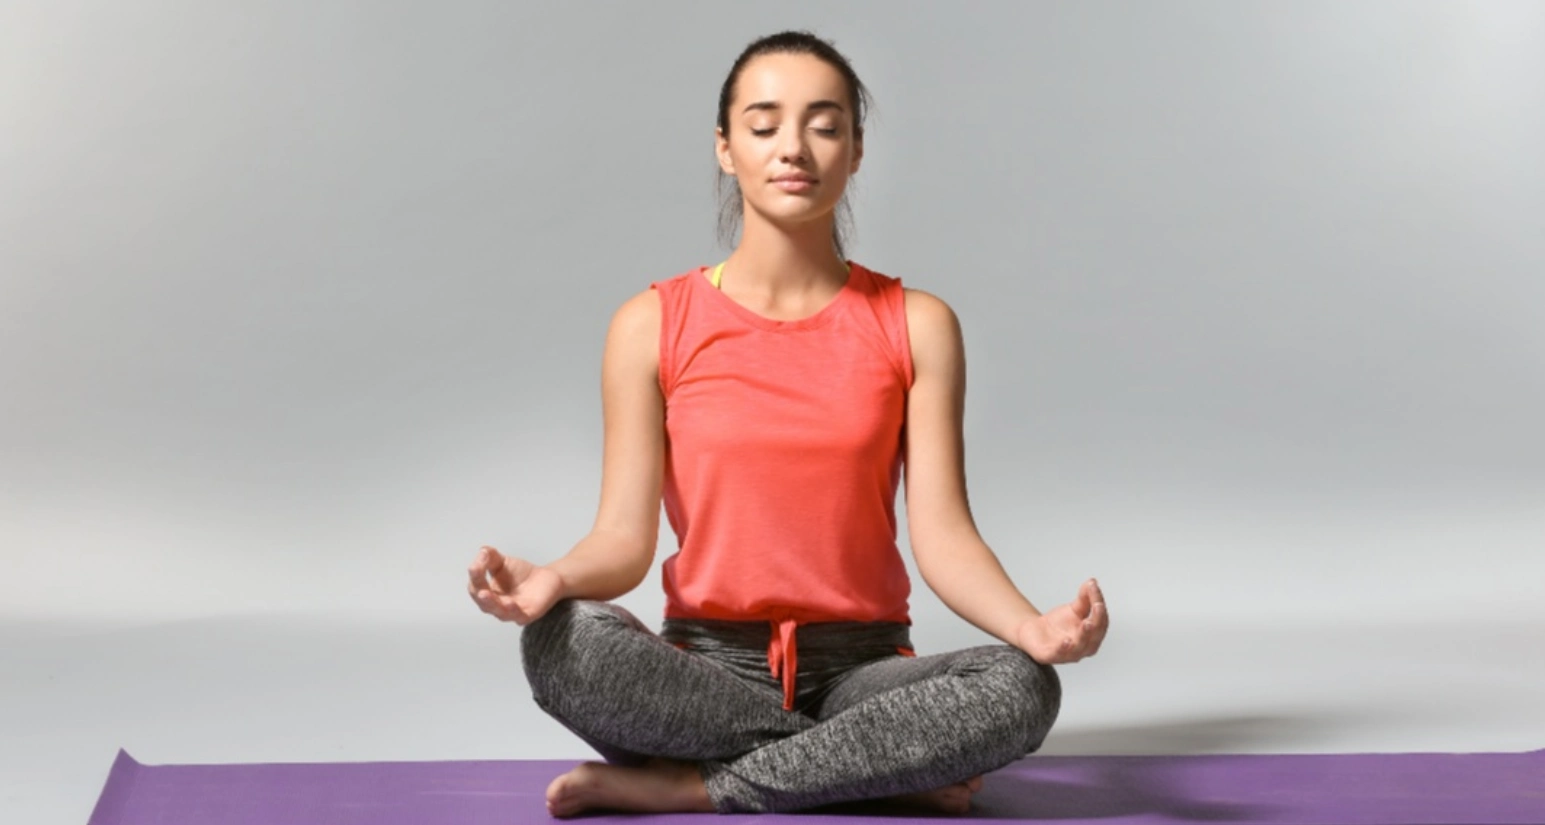
Benefits of Easy Pose for Beginners:
- Promotes a Calm Mind: Sitting in Sukhasana helps to calm the mind, making it an adequate posture for reducing anxiety and stress. It is conducive to meditation and mindfulness practices, which are essential for mental health.
- Improves Flexibility: Regular practice gently stretches the hips, thighs, and legs, aiding in the development of flexibility in these areas.
- Strengthens the Back: Holding the spine straight in Easy Pose strengthens the back muscles, improving posture and alleviating back pain.
- Encourages Proper Breathing: The upright posture encourages deep abdominal breathing, which is crucial for stress management and overall well-being.
- Accessible for All Levels: As a foundational pose, it is accessible to practitioners of all levels, providing a safe starting point for those new to yoga.
In order to perform an easy pose, You can simply follow the following steps.
- Start by Sitting: Begin by sitting on the edge of a folded blanket or cushion. This slight elevation helps to tilt your pelvis forward, making it easier to maintain a straight spine.
- Cross Your Legs: Cross your legs at the shins, placing each foot beneath the opposite knee. Aim to form a comfortable, triangular space between your legs and pelvis.
- Align Your Spine: Sit up tall, extending your spine upwards. Imagine a string pulling you from the crown of your head, elongating your back.
- Place Your Hands: Rest your hands on your knees or thighs, palms facing up for receptivity or down for grounding. Alternatively, you can adopt a mudra (hand position) by touching the tips of your thumb and index finger.
- Relax Your Shoulders: Draw your shoulder blades down your back, away from your ears, to release tension in the shoulders and neck.
- Set Your Gaze: Soften your gaze or close your eyes to turn your attention inward. Focus on your breath, inhaling deeply and exhaling slowly.
- Hold and Breathe: Remain in Sukhasana for as long as comfortable, ideally spending a few minutes to experience its calming effects fully. Use this time to practice mindful breathing or meditation.
- Switch Leg Crossing: To ensure balanced flexibility, switch the cross of your legs and repeat the pose for the same amount of time.
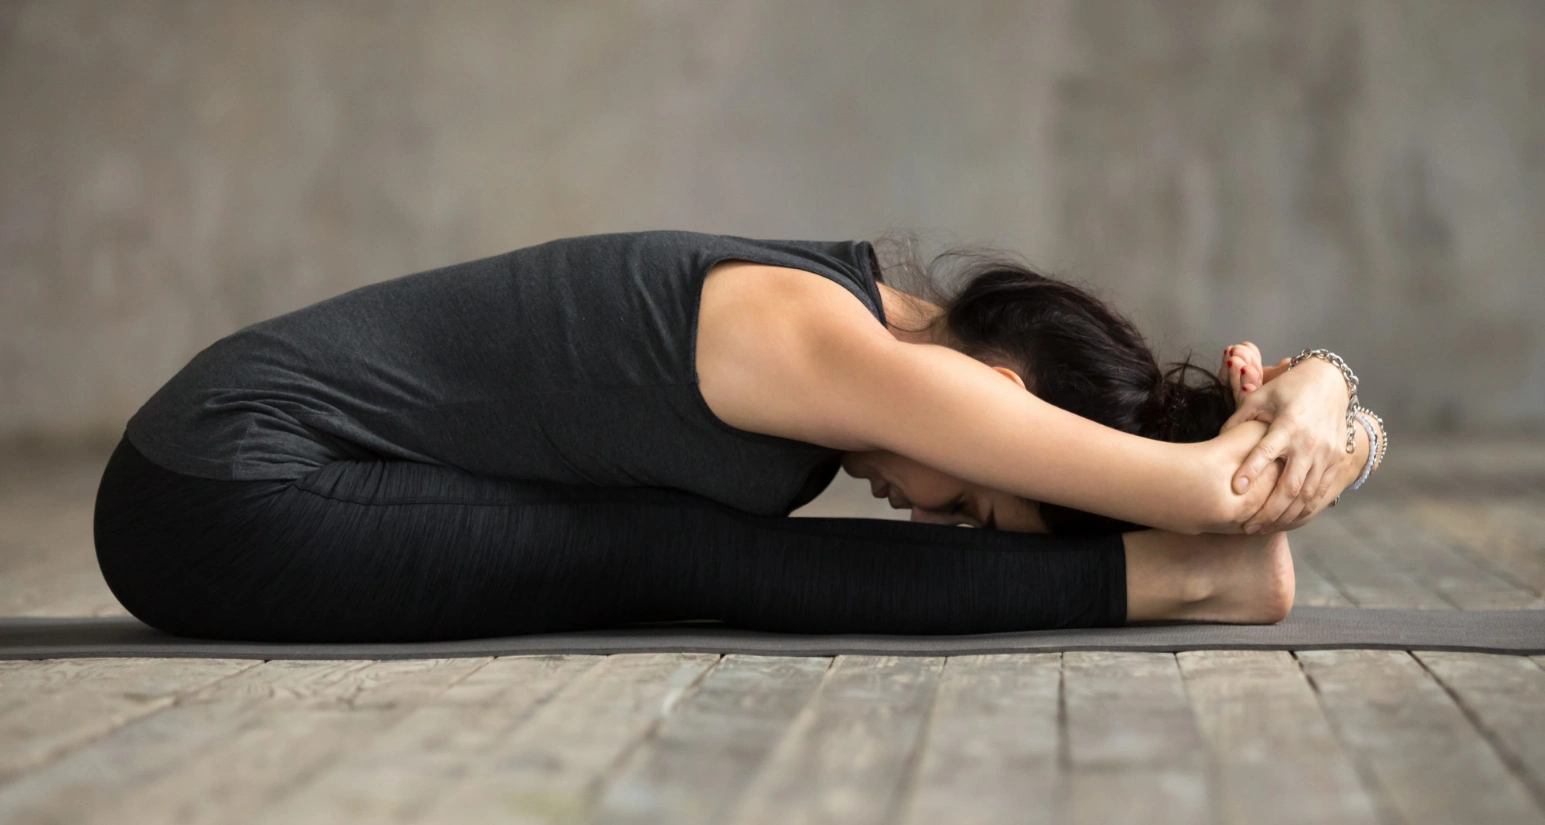
Seated Forward Bend/Paschimottanasana
The Seated Forward Bend, or Paschimottanasana, is a classic yoga pose known for its deep stretch along the entire posterior chain of the body, from the spine through the hamstrings. This pose embodies the perfect balance between stretching and relaxation, offering a multitude of benefits, especially for beginners.
It encourages the practitioner to turn inward, promoting a sense of calm and introspection while physically engaging the body’s backside.
Benefits of Seated Forward Bend for Beginners:
- Enhances Flexibility: Paschimottanasana profoundly stretches the hamstrings, spine, and shoulders, which can improve overall flexibility and ease tension in these areas.
- Calms the Mind: The forward bending motion naturally induces a calming effect on the brain, helping to relieve stress and mild depression.
- Stimulates Digestion: The folding motion of the torso can stimulate the abdominal organs, potentially improving digestion.
- Improves Posture: Regular practice of this pose encourages a straighter spine and better posture by lengthening and stretching the back muscles.
- Therapeutic for Anxiety: The reflective nature of the pose, coupled with deep breathing, can be therapeutic for anxiety and fatigue.
In order to perform seated forward bend, You can simply follow the following steps.
- Begin in a Seated Position: Sit on the floor with your legs stretched out in front of you. If your hamstrings are tight, consider sitting on a folded blanket to elevate your hips for better alignment.
- Inhale and Prepare: Inhale and raise your arms overhead, lengthening your spine. Engage your quadriceps slightly to release the hamstrings.
- Exhale and Extend Forward: Exhale as you hinge at the hips, extending your torso forward over your legs. Aim to maintain a long spine rather than rounding excessively.
- Grasp Your Feet: Reach for your feet, ankles, or shins wherever your hands comfortably reach without straining. If you can’t get your feet, use a yoga strap around the soles of your feet, holding it with both hands.
- Deepen the Pose with Breath: With each inhale, lengthen the spine a bit more, and with each exhale, gently deepen the forward bend. Avoid pulling yourself forcefully; let your breath guide the movement.
- Hold and Relax: Hold the pose for 1-3 minutes, allowing your body to relax deeper into the stretch with each breath. Keep your shoulders relaxed and away from your ears.
- Release the Pose: To come out of the pose, inhale as you lift your torso, stretching your arms forward and up, then exhale and lower your arms to your sides.
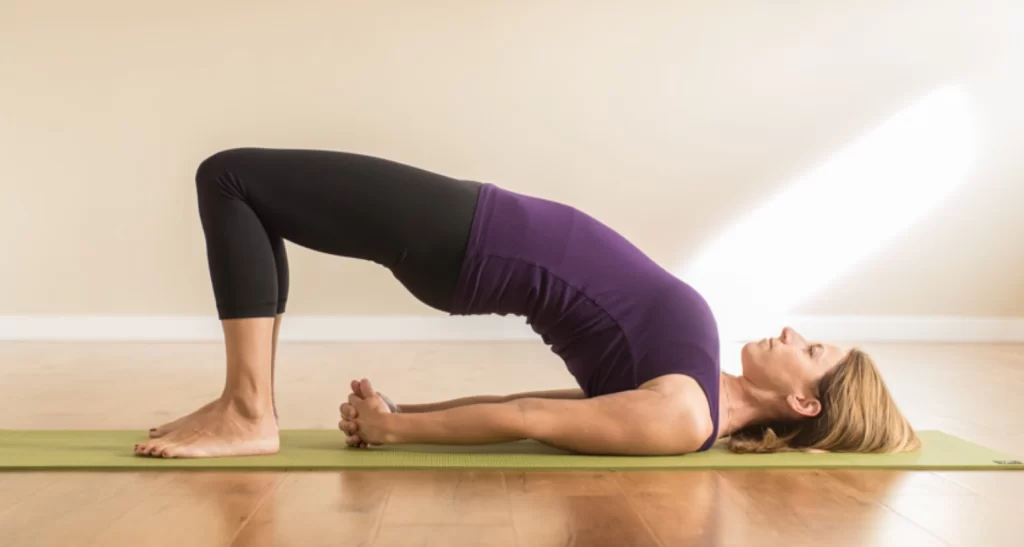
Bridge Pose/Setu Bandhasana
Bridge Pose, or Setu Bandhasana, is a dynamic backbend that offers a myriad of benefits, particularly beneficial for beginners in yoga.
It serves as a gentle introduction to backbends while effectively strengthening the back, legs, and feet.
This pose not only fortifies the body but also helps in improving posture and alleviating stress by opening the chest and shoulders.
In order to perform bridge pose, You can simply follow the following steps
- Start Position: Begin by lying on your back on a yoga mat, with your knees bent and feet flat on the floor, hip-width apart. Place your arms at your sides, palms facing down.
- Foot Placement: Ensure that your feet are parallel to each other and that your fingertips can barely touch your heels. This positioning helps to ensure proper alignment and maximises the effectiveness of the pose.
- Lift Into the Pose: Press your feet and arms firmly into the floor, and on an inhale, gently lift your hips towards the ceiling. Keep your thighs and feet parallel as you lift.
- Engage Your Core and Legs: Activate your core muscles and engage your buttocks lightly, ensuring that they do not clench, which will help support your hips in the lifted position. Keep your knees directly over your ankles.
- Shoulder Support: If comfortable, roll your shoulders underneath your body and interlace your fingers, pressing your arms down to lift your torso higher. This helps to open the chest further.
- Hold the Pose: Hold the Bridge Pose for 30 seconds to 1 minute, breathing deeply. Maintain a steady and even breath to help support the pose and enhance relaxation.
- Release from the Pose: To come out of the pose, release your hands and gently lower your hips back to the floor on an exhale. Rest for a few breaths, then hug your knees into your chest to gently stretch your lower back.
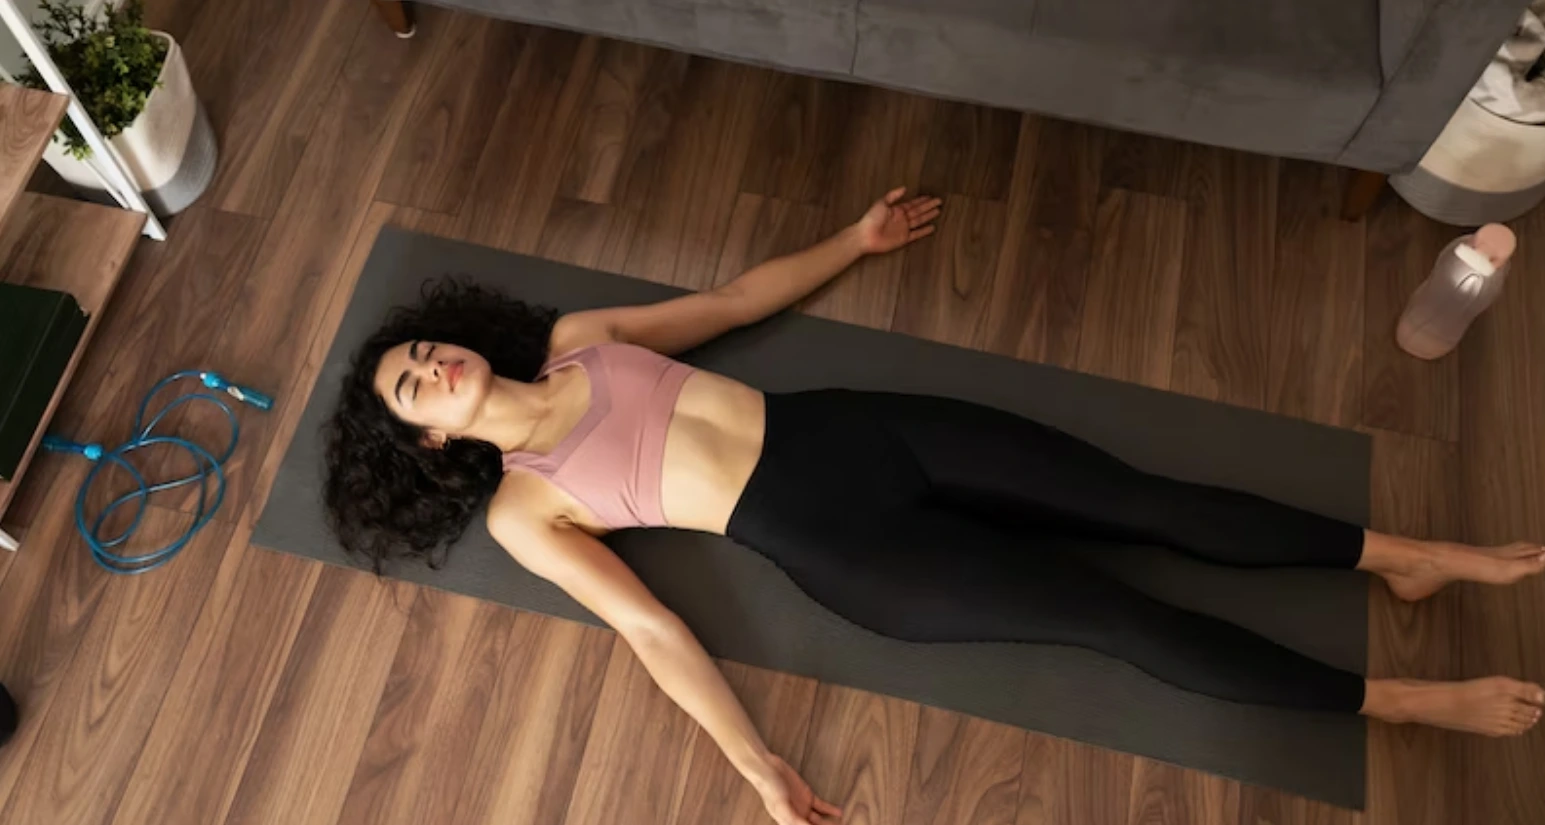
Corpse Pose, or Savasana.
Corpse Pose, or Savasana is a fundamental aspect of yoga practice, often used to conclude a session. Despite its simplicity, Savasana is one of the most challenging poses due to the level of relaxation and stillness it requires.
Its primary purpose is to facilitate complete physical, mental, and emotional relaxation. After a sequence of active poses, Savasana allows the body to absorb the benefits of the practice, serving as a period of rest, integration, and rejuvenation.”
For beginners, Savasana is essential, teaching the art of relaxation and marking a time for the body to integrate the physical and mental efforts expended during the session.
Benefits of Corpse Pose for Beginners:
- Promotes Deep Relaxation: Savasana helps transition the body into a deeply relaxed state, reducing stress and calming the nervous system, which is vital for overall well-being.
- Cultivates Body Awareness: Lying still in Savasana allows beginners to become more aware of their body, noticing areas of tension or discomfort that they can address in their practice.
- Enhances Concentration: The practice of stilling the mind in Savasana improves concentration and mental clarity, benefits that extend beyond the yoga mat into daily life.
- Improves Sleep: Regular practice of Savasana can enhance the quality of sleep by teaching the body and mind how to enter a state of relaxation more quickly.
- Integrates the Practice: It provides a necessary pause for the body to absorb the effects of the poses performed, integrating the physical with the mental and emotional aspects of yoga.
In order to perform corpse pose, You can simply follow the following steps:
- Find Your Position: Lie on your back on a comfortable, flat surface. Ensure your environment is conducive to relaxation—quiet, with minimal distractions. Optionally, cover yourself with a blanket for warmth.
- Adjust Your Limbs: Let your legs fall naturally apart, and your arms rest by your sides, palms facing up. Adjust your position so that you are as comfortable as possible, perhaps placing a bolster under your knees or a folded blanket under your head.
- Relax Your Body: Close your eyes and take a few deep breaths. With each exhale, consciously release tension from every part of your body, starting from your toes and moving upwards to the crown of your head.
- Calm Your Mind: Try to clear your mind of active thoughts or worries. When thoughts arise, acknowledge them without judgment and then gently let them float away, returning your focus to your breath.
- Deepen Your Relaxation: Focus on your breath, allowing it to become slower and more profound. With each exhale, imagine yourself sinking deeper into a state of complete relaxation.
- Stay in Savasana: Remain in this pose for 5-15 minutes, allowing your body and mind to embrace the relaxation fully. The longer you can stay, the deeper the benefits.
- Gently Reawaken: To exit Savasana, start by deepening your breath. Gently move your fingers and toes, awakening your body. Roll onto one side, keeping your eyes closed, and rest there for a moment. Then, use your hands to help yourself sit up, opening your eyes slowly.
Conclusion
In summary, exploring foundational yoga poses from Mountain Pose to Corpse Pose provides beginners with a clear path to improve their physical and mental well-being.
Each pose is a step toward better health, offering specific benefits such as improved strength, flexibility, and peace of mind.
The practice emphasises proper posture, controlled breathing, and careful movement, which are essential for a successful yoga experience.
These poses help newcomers build a strong base for their yoga practice, promoting physical fitness and mental calmness. From the energising effects of Warrior II to the relaxing benefits of Corpse Pose, yoga is accessible to everyone, regardless of their experience level.
It offers various ways to enhance one’s lifestyle, whether the goal is to reduce stress, increase mobility, or find mental clarity.
By regularly practising yoga, individuals can experience significant improvements in their overall health and well-being. Patience and mindfulness during practice can lead to personal growth and a deeper understanding of one’s body and mind. Yoga is not just about physical postures; it’s a journey toward achieving balance and harmony in life.
Related blog
When we talk about yoga, we don’t take into consideration…
yogabase . 3 weeks ago
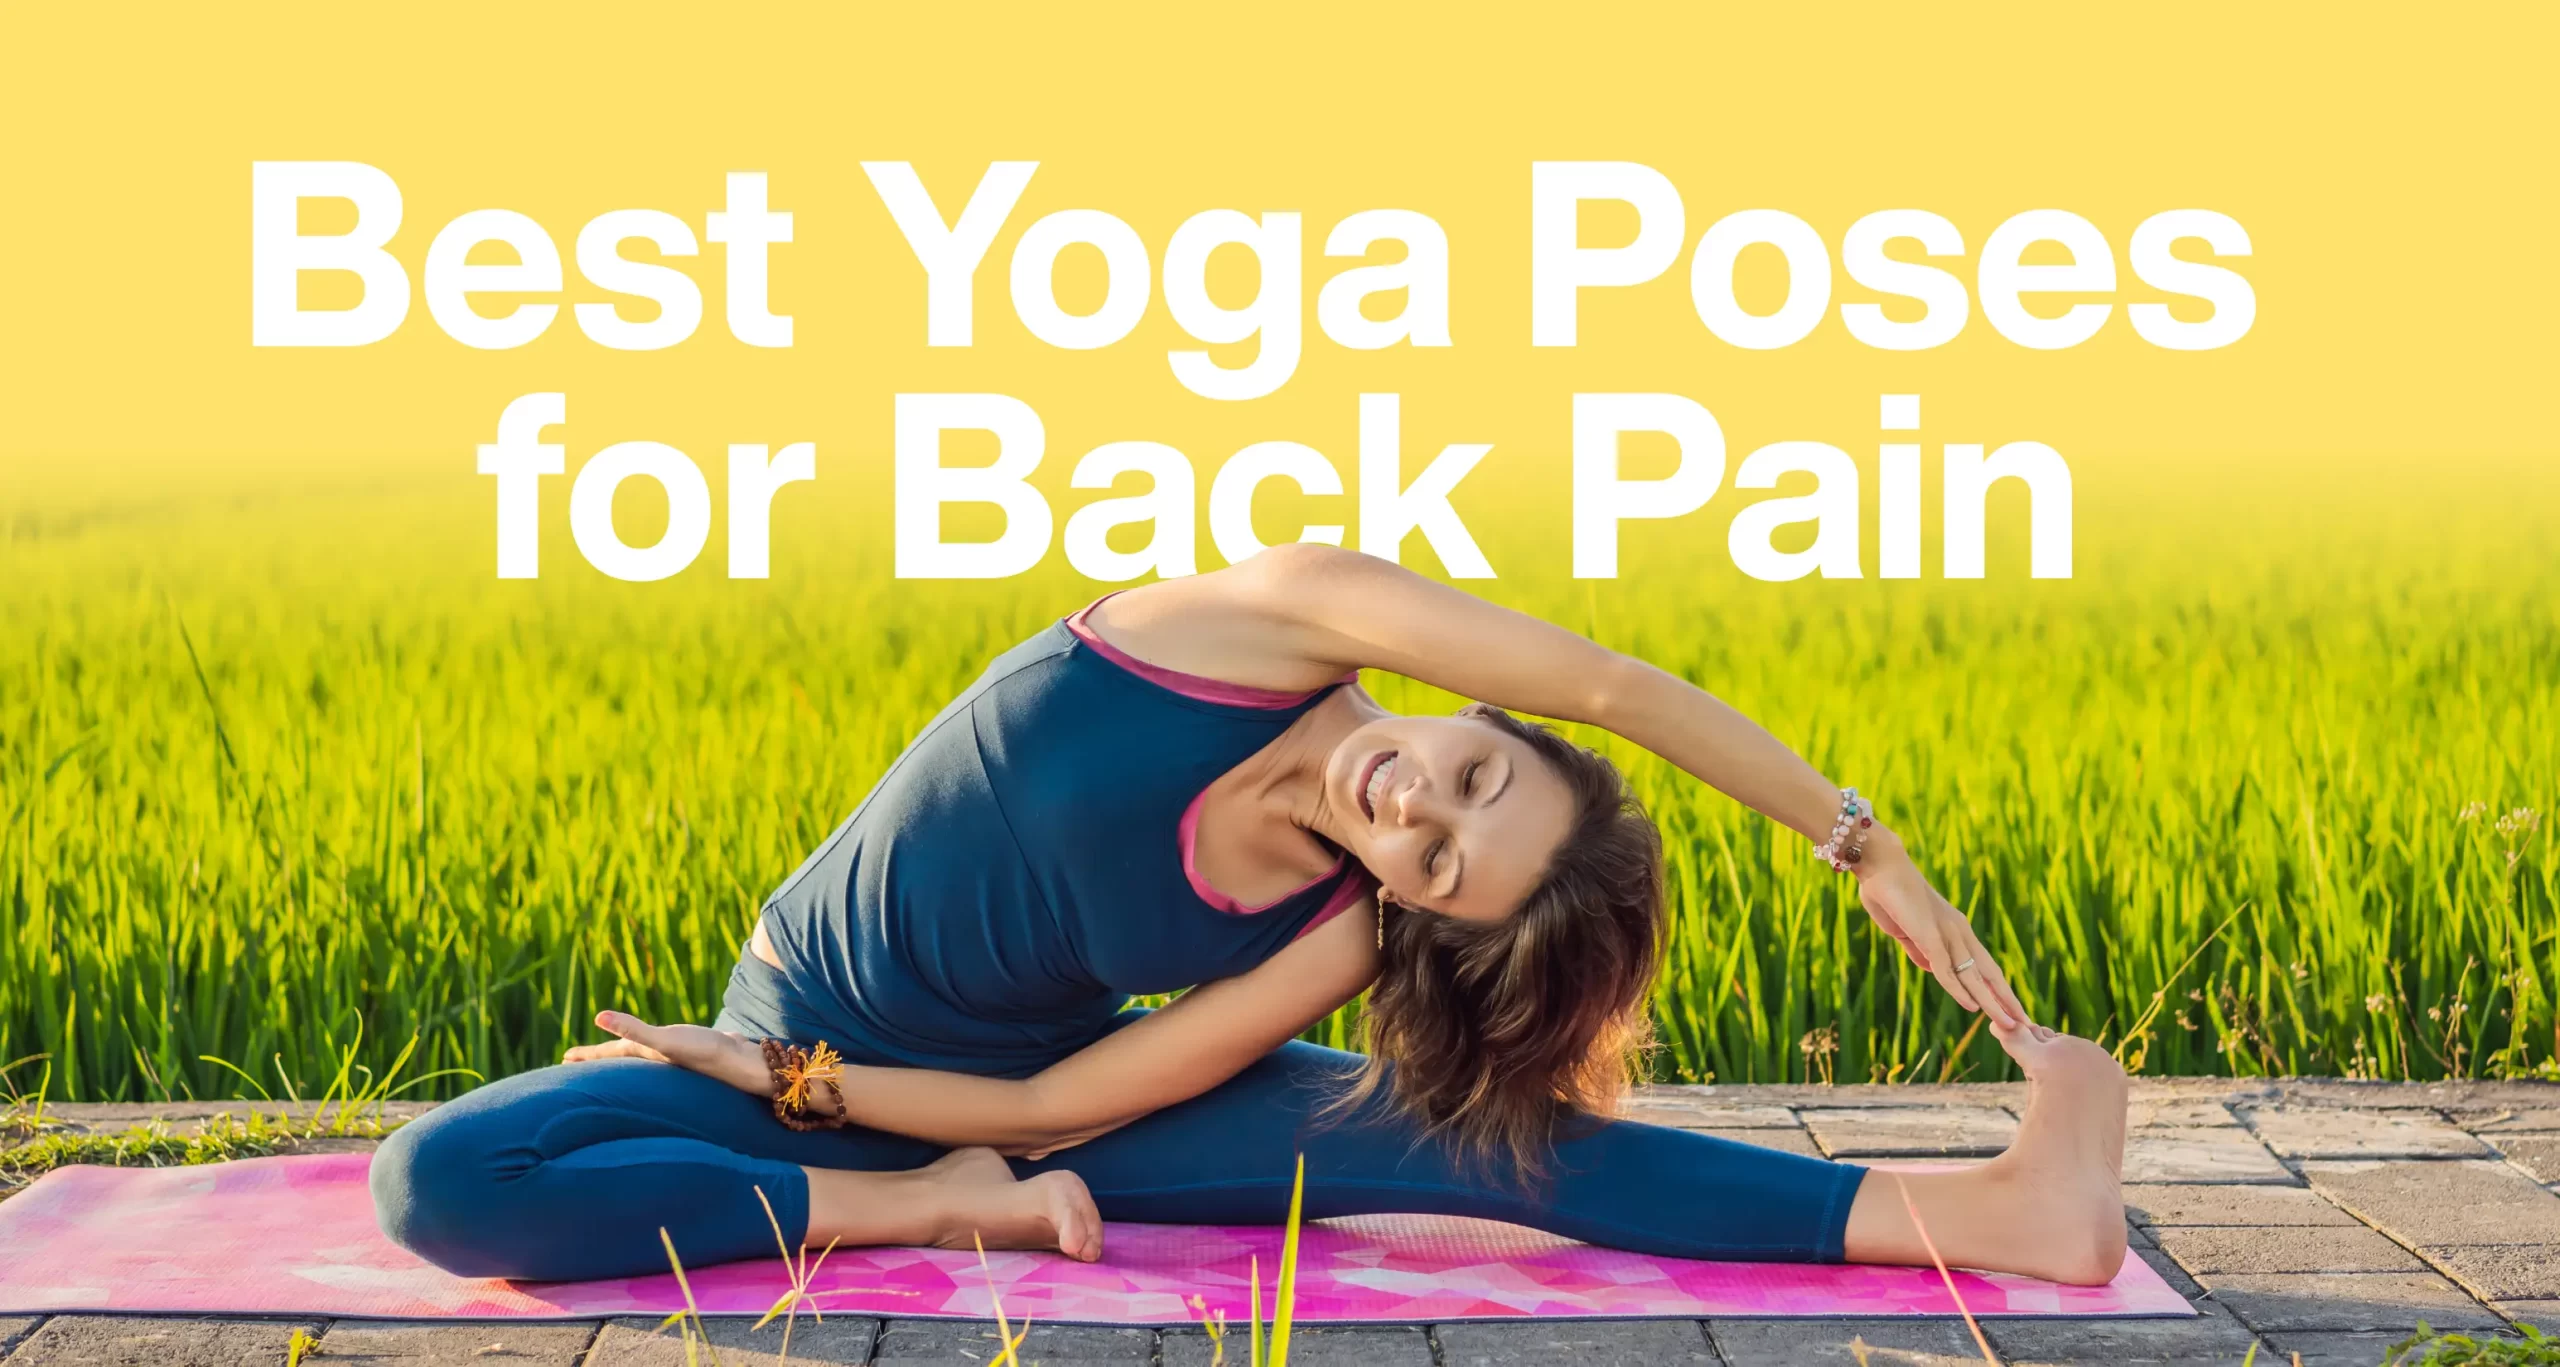
Back pain has quickly become one of the most common…
yogabase . 3 weeks ago
The modern lifestyle has left everyone with less time for…
yogabase . 2 months ago

Definition of Yoga & Brief Overview of Yoga’s Origins Yoga,…
yogabase . 3 months ago
Inner peace is becoming more and more difficult in the…
yogabase . 4 months ago
How does yoga create balance in your life ? Ever…
yogabase . 5 months ago
Starting a yoga practice begins with learning basic yoga poses,…
yogabase . 6 months ago